
Old windows rescued from demolition sites, salvage yards, or grandma’s barn can transform a blank wall into a striking focal point. Their weathered frames, wavy glass, and divided panes bring texture and character that mass-produced decor simply can’t match. Homeowners are increasingly turning to architectural salvage not just for sustainability, but because vintage windows offer authentic charm and versatility. Whether mounted solo as a statement piece or grouped in multiples, these reclaimed treasures work in nearly any room, from farmhouse kitchens to modern bedrooms. This guide covers practical ways to clean, prep, mount, and style old windows as wall decor, plus creative finishing ideas that go beyond the standard distressed-paint treatment.
Key Takeaways
- Old window wall decor delivers authentic architectural character and visual interest that mass-produced decor cannot replicate, with frames featuring superior wood grain and glass with natural imperfections that catch light beautifully.
- Salvaged vintage windows are widely available and affordable ($10–$75 per window), making them an accessible way to create striking focal points in any room from farmhouse kitchens to modern bedrooms.
- Multi-pane old windows work as functional wall art for photo displays, message boards, chalkboards, or cork inserts, transforming a single piece into an interactive design element.
- Bold paint colors like navy, charcoal, and deep green can modernize vintage window frames while preserving their architectural lines, or milk paint and whitewashing offer softer updates that maintain natural wood character.
- Proper mounting at studs with 2.5-inch screws at two points minimum ensures safety, while centering solo windows at 57–60 inches from the floor achieves standard gallery height.
- Before installing old windows indoors, verify they are lead-paint safe—intact finishes can be sealed, but flaking paint requires professional abatement to protect your family.
Why Old Windows Make Perfect Wall Decor
Vintage windows deliver instant architectural interest. Their frames, whether built from old-growth pine, oak, or fir, often feature tighter grain and more durability than modern dimensional lumber. The wood’s natural patina develops over decades and can’t be faked with new materials.
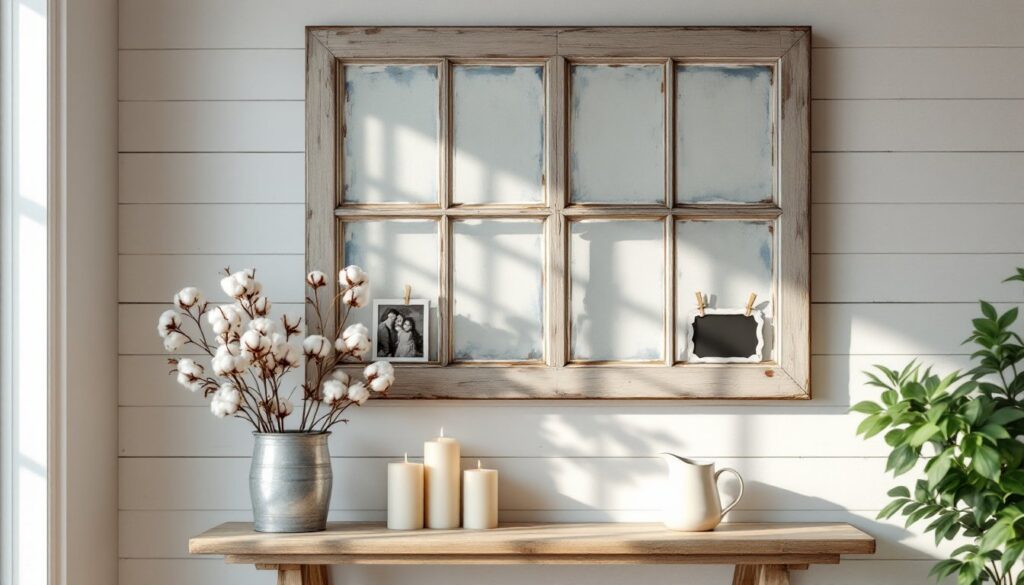
The glass itself adds dimension. Single-pane windows from the early to mid-20th century often have slight waviness and imperfections that catch light differently throughout the day. Multi-pane designs (six-over-six, nine-over-nine, or twelve-lite configurations) create built-in grids that function as ready-made frames for photos, pressed botanicals, or layered artwork.
From a practical standpoint, old windows are widely available and affordable. Salvage yards, Habitat for Humanity ReStores, estate sales, and demolition projects regularly stock them for $10 to $75 per window, depending on size and condition. They’re also lightweight compared to framed mirrors or solid wood art, which simplifies mounting.
Safety note: Before bringing salvaged windows indoors, check for lead paint. Homes built before 1978 often used lead-based paints. If the finish is intact and not chipping, encapsulation with a clear sealer is usually sufficient. If paint is flaking, consider professional lead abatement or choose a different window.
Rustic Farmhouse Window Wall Displays
Farmhouse style celebrates the worn, the authentic, and the utilitarian, making old windows a natural fit. For a classic look, mount a four-pane or six-pane window horizontally above a console table, bench, or bed. Leave the original finish intact if the paint is stable, or lightly sand and apply a matte sealer to preserve the weathered texture without adding shine.
Layering works well in farmhouse settings. Lean a large window against the wall on a mantel or shelf, then add smaller elements in front, galvanized buckets, candles, or stoneware crocks. This approach avoids the commitment of drilling into the wall and allows seasonal swaps.
For a gallery effect, hang three to five windows of varying sizes in an asymmetrical cluster. Use windows with different pane counts (a two-pane paired with a six-pane and a nine-pane) to keep the arrangement from looking too uniform. Space them 3 to 5 inches apart and align the tops or bottoms loosely rather than forcing a perfect grid.
Mounting tip: Locate studs with a stud finder and drive 2.5-inch screws through the window frame directly into the wall framing. Old windows often have thin frames: toggle bolts or drywall anchors rated for the window’s weight (usually 5 to 15 pounds) work if studs aren’t conveniently placed. Always mount at two points minimum to prevent tilting.
Turn Vintage Windows Into Functional Wall Art
Photo Gallery and Memory Display Windows
Multi-pane windows make excellent photo displays. Remove the glass panes (or leave them in place for a layered look), then mount photos behind each opening using double-sided photo tape or small binder clips attached to twine strung across the back of the frame.
For a cleaner finish, print photos sized to fit each pane opening exactly, typically 4×6, 5×7, or custom crops depending on the window’s muntin spacing. Secure them with archival tape on the backside of the frame, facing outward through the glass. This method protects photos from dust and fingerprints.
Another approach: attach small wire clips or clothespins to jute twine strung horizontally across the window’s back. This allows easy photo rotation and works especially well for seasonal family updates or kids’ artwork.
Message Boards and Chalkboard Windows
Converting panes into chalkboard surfaces adds function. Remove the glass, cut hardboard or MDF to fit each opening, and paint it with two coats of chalkboard paint. Secure the boards from behind using small finishing nails or construction adhesive. Once cured, season the chalkboard by rubbing the side of a piece of chalk over the entire surface, then erasing, this prevents ghosting.
For a dry-erase alternative, use whiteboard paint or simply leave the glass in place and write on it with washable glass markers. Wipe clean with a damp cloth. This works particularly well in mudrooms, kitchens, or home offices for grocery lists, reminders, or weekly menus.
Cork board inserts are another functional option. Cut 1/4-inch cork sheets to fit each pane, then glue them in place with contact cement. These provide pinnable surfaces for notes, recipes, or inspiration boards.
Creative Color and Finish Options for Window Frames
Not every old window needs to stay chippy and distressed. Satin or semigloss paint in bold colors, navy, charcoal, deep green, or even black, can modernize a vintage frame while retaining its architectural lines. Clean the frame thoroughly, lightly sand to degloss old finishes, apply a bonding primer, then two coats of latex paint.
For a softer update, milk paint creates a matte, chalky finish with natural color variation. It works especially well on raw or previously stripped wood. Milk paint can be left as-is for a flat finish or sealed with paste wax for subtle sheen and added durability.
Whitewashing offers a middle ground between raw wood and solid paint. Mix one part white latex paint with two parts water, brush onto the frame, then wipe back with a rag while still wet. This technique highlights wood grain while lightening the overall tone.
Leaving the glass clear is common, but there are creative alternatives. Frosted glass spray adds privacy and diffuses light, useful if the window backs a mirror or hangs near a bright fixture. Stained glass paint applied freehand or with stencils introduces color without permanently altering the glass.
For a totally different look, replace missing panes with materials like chicken wire, burlap, decorative metal sheets, or reclaimed wood slats. This adds texture and makes the piece more sculptural than traditional wall art.
Best Rooms and Placement Ideas for Old Window Decor
Entryways and hallways benefit from vertical windows mounted near the door or at the end of a narrow corridor. A tall, narrow window (casement style or a single-sash unit) draws the eye upward and makes tight spaces feel less cramped.
Living rooms can handle larger or multiple windows. Mount a statement piece above a sofa or fireplace, sized roughly two-thirds the width of the furniture below it. Pair with simple decor, a single window has enough visual weight that it doesn’t need competing elements.
Bedrooms work well with symmetrical pairs flanking the bed or a single window centered above the headboard. Keep finishes soft (whites, grays, natural wood) to maintain a restful atmosphere.
Kitchens and dining rooms are natural homes for farmhouse-style windows. Hang one above open shelving, a farmhouse sink, or a sideboard. Functional inserts like chalkboards or cork boards make particular sense here.
Bathrooms can incorporate smaller windows, especially if they’re treated as faux mirrors (remove glass and back with actual mirror cut to size) or as decorative accents above freestanding tubs. Ensure any wood is sealed properly in high-humidity environments to prevent warping.
Mounting height matters. For windows hung solo, center them at 57 to 60 inches from the floor to the center of the frame, standard gallery height. When grouping multiple windows, treat the entire cluster as one unit and center that grouping at eye level. Over furniture, leave 6 to 10 inches of clearance between the furniture top and the window’s bottom edge.