
Narrow hallways often feel like wasted space, too cramped to furnish, too dim to decorate, and just awkward enough to ignore. But a tight corridor doesn’t have to be a design dead zone. With the right combination of color, lighting, storage, and visual tricks, even a three-foot-wide passage can become a functional, inviting part of the home. The key is working with the space’s proportions, not against them. This guide walks through proven strategies homeowners can use to make narrow hallways feel wider, brighter, and more intentional, without knocking down walls or starting a major renovation.
Key Takeaways
- Light colors, vertical stripes, and strategic paint techniques like ombré effects make narrow hallways feel wider and brighter without major renovation.
- Mirrors are powerful tools for creating the illusion of space—place them opposite windows or light sources and consider mirrored gallery walls or closet doors to amplify brightness.
- Choose slim, wall-mounted furniture (10–12 inches deep) and tall, narrow bookcases to maximize storage while maintaining the 36-inch minimum clear passage width required for safety.
- Layer your lighting with overhead fixtures, wall sconces at eye level, and accent lights along baseboards to eliminate the tunnel-like feel of a single overhead light.
- Narrow hallway decor improves with horizontal wall art arrangements, runners with visible floor borders, and diagonal flooring patterns that visually widen the space.
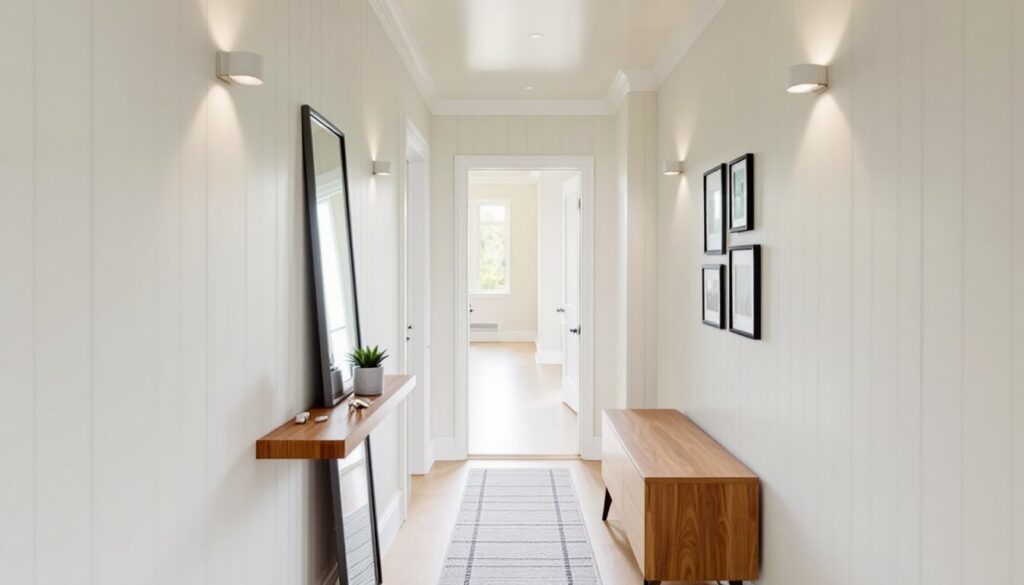
Use Light Colors and Strategic Paint Techniques
Light paint colors are the fastest fix for a cramped hallway. White, soft gray, pale beige, and cool pastels reflect more light than dark hues, making walls visually recede. This isn’t about going stark white, off-whites with warm undertones keep the space from feeling sterile.
For even more impact, consider vertical stripes or a subtle ombré effect from ceiling to baseboard. Vertical stripes draw the eye upward, adding perceived height. Run painter’s tape in 4- to 6-inch intervals, alternate stripes in two shades of the same color family, and use a low-nap roller for smooth coverage. An ombré gradient, darker at the baseboard, fading to lighter at the ceiling, creates depth without chopping up the wall plane.
Another effective trick: paint the ceiling a shade lighter than the walls, or use a high-gloss or satin finish on the ceiling to bounce light downward. Flat paint absorbs light: satin or eggshell finishes on walls add a gentle sheen that brightens the corridor without showing every scuff.
Don’t forget trim. Painting baseboards, door frames, and crown molding in bright white creates clean lines and contrast, sharpening the hallway’s geometry and preventing visual clutter. A gallon of quality interior paint typically covers 350–400 square feet, so one gallon is usually enough for a standard 3-foot by 10-foot hallway with 8-foot ceilings, including a second coat.
Install Mirrors to Create the Illusion of Space
Mirrors are among the most powerful tools for opening up a narrow hallway. A large mirror placed opposite a window or light source doubles the perceived brightness and visually extends the width of the space.
Consider a full-length leaning mirror (at least 60 inches tall) propped against one wall. Frameless or thin-framed designs keep the look streamlined. If wall-mounting, use heavy-duty picture hangers or French cleats rated for the mirror’s weight, most large mirrors weigh 20–40 pounds. Always anchor into wall studs (16 inches on center in most residential framing) or use toggle bolts in drywall for secure support.
For a more custom approach, install a mirrored gallery wall: arrange several smaller mirrors (12×12 or 16×20 inches) in a staggered grid. This creates visual interest while still amplifying light. Use a level and painter’s tape to mock up the layout before hammering a single nail.
Another option is mirrored closet or cabinet doors. If the hallway includes a linen closet or utility door, swapping standard doors for mirrored bifolds or sliding panels maximizes reflection without taking up floor space. Just ensure mirrors are positioned where they won’t startle people coming around corners, safety and function go hand in hand.
Choose Slim Furniture and Smart Storage Solutions
Traditional console tables are too deep for narrow hallways. Instead, look for slim console tables or wall-mounted shelves no more than 10–12 inches deep. A floating shelf at 30–36 inches off the floor provides a landing spot for keys, mail, or decor without crowding the walkway.
If the hallway is at least 42 inches wide (the minimum for comfortable passage with furniture), a narrow bench works well. Look for designs 14 inches deep or less, ideally with built-in storage underneath, lift-top seats or open cubbies for shoes. Benches serve double duty: seating for putting on shoes and hidden storage for hats, gloves, or pet supplies.
Wall-mounted coat hooks or a peg rail keep outerwear off the floor. Install hooks at 60–65 inches for adults, lower for kids. Use #8 wood screws driven into studs for maximum hold, or heavy-duty drywall anchors rated for at least 20 pounds each if studs aren’t conveniently located.
For vertical storage, consider a tall, narrow bookcase (8–10 inches deep). These fit against a wall without obstructing traffic and can hold books, baskets, or decorative objects. Always secure tall furniture to the wall with an anti-tip bracket, especially important in homes with children or pets.
Avoid bulky furniture, oversized decor, or anything that forces people to turn sideways. The 36-inch minimum clear width required by the International Residential Code (IRC) for hallways is a baseline: leave at least that much open for safe, comfortable passage.
Layer Lighting for Depth and Ambiance
A single overhead fixture casts flat, uninspiring light and emphasizes a hallway’s tunnel-like qualities. Layered lighting, combining ambient, task, and accent sources, adds dimension and warmth.
Start with overhead lighting. Flush-mount or semi-flush ceiling fixtures work best in hallways with standard 8-foot ceilings. For higher ceilings, a small chandelier or pendant can add visual interest. Space multiple fixtures 6–8 feet apart in long hallways to eliminate dark pockets.
Next, add wall sconces. Mount them 60–66 inches off the floor (roughly eye level) and space them every 8–10 feet. Sconces create pools of light that break up the linear monotony and highlight artwork or architectural details. Use LED bulbs (9–12 watts, equivalent to 60-watt incandescent) in a warm white (2700–3000K) to keep the space cozy. LEDs run cooler and last longer, important in enclosed fixtures.
For accent lighting, install recessed puck lights or LED strip lighting along the baseboard or under floating shelves. Low-voltage LED strips draw minimal power and can be controlled with a dimmer for adjustable ambiance. Battery-operated motion-sensor lights are also handy for nighttime navigation, especially near stairs.
All electrical work should follow the National Electrical Code (NEC). Adding new fixtures often requires running cable through walls or ceilings. If the project involves opening walls or connecting to the home’s electrical panel, hire a licensed electrician or pull a permit if required by local jurisdiction. Safety first, always turn off power at the breaker before working on any electrical circuit.
Add Visual Interest with Wall Art and Gallery Walls
Bare walls make narrow hallways feel longer and more oppressive. Wall art and gallery walls add personality and give the eye something to focus on, shortening the perceived distance.
In tight spaces, a single large piece (24×36 inches or bigger) works better than a cluster of small frames. Hang artwork so the center is at 57–60 inches from the floor, the standard gallery height that aligns with average eye level. Use a picture-hanging kit with a wire and two D-rings for heavier frames, and ensure hooks are anchored into studs or use heavy-duty anchors.
For a gallery wall, keep frames uniform in color (all black, all white, or all natural wood) to avoid visual chaos. Vary the sizes but maintain consistent spacing, 2–3 inches between frames creates cohesion without crowding. Lay the arrangement out on the floor first, or use painter’s tape on the wall to mark frame positions before committing to nail holes.
Horizontal arrangements make a narrow hallway feel wider: vertical stacks emphasize height. Mix framed prints, photographs, and even shallow shadow boxes for three-dimensional interest. Avoid heavy, ornate frames that add visual weight.
Other wall decor options include removable wallpaper with subtle patterns (thin stripes, delicate geometrics) or a photo ledge (a narrow shelf that holds frames without nails). A ledge lets homeowners swap art seasonally without patching drywall. Just mount the ledge securely with screws driven into studs, most hold 10–15 pounds when properly installed.
Incorporate Runners, Rugs, and Flooring Tricks
The right hallway runner can visually widen a narrow space or add a shot of color and pattern. Choose a runner that’s 6–12 inches narrower than the hallway width to leave a border of flooring visible on each side. This framing effect prevents the rug from wall-to-wall coverage, which can make the space feel even tighter.
For pattern, horizontal stripes or geometric designs create width: lengthwise stripes elongate. Avoid overly busy patterns that compete with walls and decor. Natural fiber runners (jute, sisal) add texture but can be rough underfoot: low-pile synthetic or wool blends are softer and easier to clean.
Secure runners with a non-slip rug pad underneath. This prevents bunching and tripping hazards, critical in high-traffic areas. Trim the pad to fit just inside the rug edges so it doesn’t show.
If replacing flooring, consider diagonal or herringbone patterns in hardwood, laminate, or luxury vinyl plank. Diagonal installation draws the eye outward, making the hallway appear wider. Lighter wood tones (maple, birch, light oak) reflect more light than dark stains. For tile, use large-format tiles (12×24 inches or bigger) with minimal grout lines to reduce visual clutter.
Flooring transitions matter, too. If the hallway connects rooms with different flooring types, use a low-profile transition strip (T-molding or reducer) to avoid a jarring threshold. Keep the hallway flooring consistent from end to end for a smoother, more cohesive look.
Conclusion
A narrow hallway doesn’t have to be a design afterthought. With strategic paint, well-placed mirrors, slim storage, layered lighting, thoughtful art, and the right flooring choices, even the tightest corridor can become a functional, welcoming space. Focus on light, scale, and verticality, and don’t be afraid to treat the hallway as a room in its own right. With a little planning and the right materials, that awkward passage becomes a polished transition the whole house benefits from.